
How to Install Floating Shelves Safely: A Beginner DIY Guide starts with a simple idea: make the change that helps your home work better before buying more materials or devices. This guide explains how to install floating shelves with realistic planning advice, safety checks, practical steps, and common pitfalls. You do not need a showroom budget, but you do need to understand your space and the limits of the tools or products you use.
Table of Contents
At a glance
Begin by inspecting your existing setup, measuring carefully, choosing compatible supplies, and allowing time to test the result. Prioritize safety, access, moisture control, and the manufacturer instructions before appearance.
Plan the shelf before drilling
Choose a wall with enough clearance to move around furniture and open doors. Decide what the shelf will hold before choosing its depth and brackets. A few books and a small plant put different demands on hardware than heavy cookware. Sketch the finished layout on painter tape so you can judge the height from across the room.
Measure the width of the wall at the intended height instead of assuming the room is square. Check whether nearby outlets, switches, plumbing, or radiators suggest hidden services. A floating shelf works best where the supports are appropriate for the wall and the expected load.
Practical check: Before you complete this stage, pause and look at the space from the position where you normally use it. Check measurements twice, keep walkways open, and make sure the improvement does not interfere with cleaning, access, or future maintenance. Small adjustments made now are much easier than changes after the project is finished.
How To Install Floating Shelves: Gather the right tools and materials
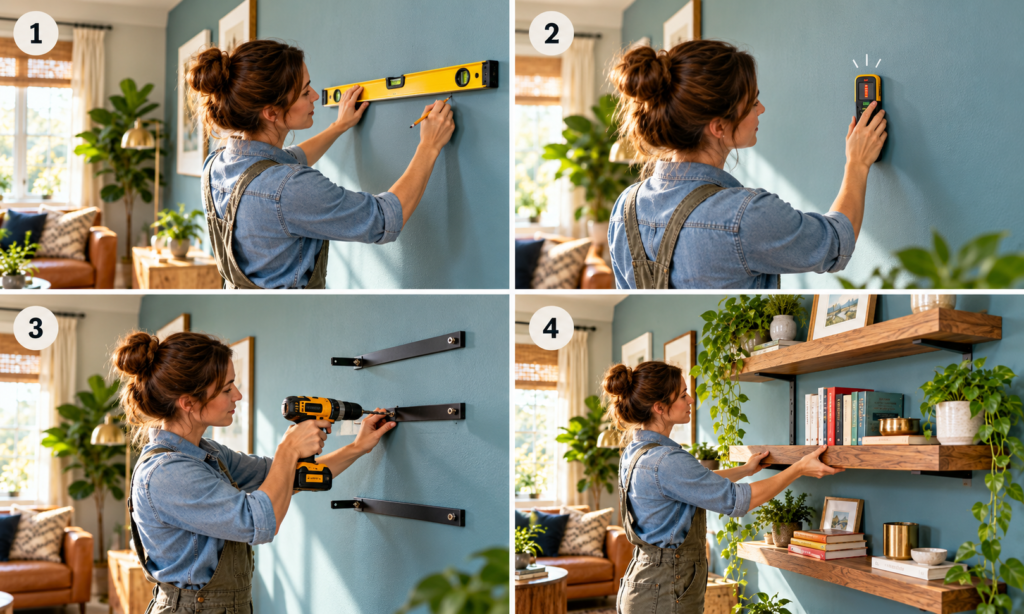
Set out a tape measure, pencil, level, drill, appropriate bits, stud finder, painter tape, safety glasses, shelf, and hardware specified by the manufacturer. Keep a small vacuum handy for drilling dust. The fastener choice matters as much as the appearance of the wood.
Check every part against the supplied instructions before making holes. If brackets are missing or a screw seems unusually short, ask the shelf manufacturer for the correct replacement. Never substitute a random drywall screw for a rated mounting screw.
A realistic example: In a busy household, a solution that takes an extra minute every day may not be used consistently. Choose hardware, storage, finishes, or settings that people can operate without a complicated routine. Test the proposed arrangement for several days when possible before committing to permanent work.
Find studs and check the wall
Run a stud finder across the proposed shelf line several times and mark likely centers. Verify suspicious readings with other evidence such as the spacing of existing fasteners, while remaining alert for pipes and electrical wiring. A stud finder is an aid, not a guarantee that a wall is clear.
For masonry or plaster, use the correct wall-specific method and hardware. Drywall alone may not support a heavy shelf safely, even if a retail anchor package claims a high load rating. When wall construction is uncertain, contact a qualified installer.
What to verify: Packaging and product listings cannot tell you everything about your particular home. Look for instructions that address surface type, weight or clearance limits, moisture exposure, and ongoing care. When instructions conflict with site conditions, ask the manufacturer or a qualified local professional instead of improvising.
For further safety context, see CPSC furniture anchoring guidance.
Mark a level reference line
Measure the desired height at both ends and draw a faint level line, or put down a level strip of painter tape. Mark the bracket hole centers directly from the actual hardware template. Do not assume that the holes are evenly spaced or perfectly centered on the shelf body.
Stand back to check alignment with trim, door frames, and nearby furniture. A shelf can be mathematically level and still look awkward against a sloped ceiling. Favor a level installation and adjust the overall composition instead of deliberately tilting the shelf.
Budget-minded alternative: If this step stretches the budget, focus on making the existing materials clean, aligned, and functional before replacing them. Save receipts and record product models. The best value often comes from a durable, simple repair rather than an attractive addition that needs frequent attention.
Drill pilot holes without surprises
Select the drill bit diameter stated in the bracket directions and make a shallow test hole only after checking for hidden services. Keep the drill perpendicular to the surface. Stop if the bit strikes unexpected resistance or the material crumbles more than expected.
Collect dust as you work and avoid widening the holes by rocking the drill. Oversized holes can prevent fasteners from gripping. If you accidentally misplace a hole, repair it properly and move the mounting location rather than installing into a weakened opening.
Practical check: Before you complete this stage, pause and look at the space from the position where you normally use it. Check measurements twice, keep walkways open, and make sure the improvement does not interfere with cleaning, access, or future maintenance. Small adjustments made now are much easier than changes after the project is finished.
Mount the brackets securely
Drive fasteners into verified framing or the correctly installed anchors for your wall material. Tighten them evenly, checking the bracket with a level after each major adjustment. Do not overtighten to the point that plaster cracks or an anchor spins freely.
Some floating shelf designs use a concealed steel rod bracket while others use a cleat. Follow the exact order specified by your hardware. If the bracket shifts under firm hand pressure before the shelf is loaded, take it down and correct the attachment.
A realistic example: In a busy household, a solution that takes an extra minute every day may not be used consistently. Choose hardware, storage, finishes, or settings that people can operate without a complicated routine. Test the proposed arrangement for several days when possible before committing to permanent work.
Fit the shelf and test the result
Slide the shelf onto its supports and install any locking screws that prevent it from lifting off. Check for gaps against the wall and confirm that the front edge stays level. Start with light objects, then add weight gradually while watching for movement.
Respect the lower of the shelf and hardware load limits, factoring in the wall structure. Keep breakable or heavy items away from places where children or pets could pull them down. A strong bracket does not make an unsuitable wall safe.
What to verify: Packaging and product listings cannot tell you everything about your particular home. Look for instructions that address surface type, weight or clearance limits, moisture exposure, and ongoing care. When instructions conflict with site conditions, ask the manufacturer or a qualified local professional instead of improvising.
Style shelves without overcrowding
Combine objects of different heights and leave some open space. Group a few books with a plant and a framed print instead of filling the entire span. Heaviest items generally belong closer to the brackets or toward the back, provided the load stays within the instructions.
For a narrow living room, two modest shelves often feel lighter than one deep shelf. In a kitchen, avoid putting unfinished wood in direct splash zones without considering moisture resistance. Wipe and inspect shelf surfaces routinely.
Budget-minded alternative: If this step stretches the budget, focus on making the existing materials clean, aligned, and functional before replacing them. Save receipts and record product models. The best value often comes from a durable, simple repair rather than an attractive addition that needs frequent attention.
Fix common installation mistakes
A visibly sloped shelf often means the mounting marks were not level or a fastener slipped while tightening. A shelf that rattles may have a loose locking screw or a bracket that does not match the shelf thickness. Repair the cause rather than hiding it with decorations.
If a drywall anchor begins to turn in its hole, remove it and use an approved repair method. Do not wedge cardboard behind a loose support. Professional help is appropriate when the wall feels hollow, damp, crumbly, or otherwise structurally questionable.
Practical check: Before you complete this stage, pause and look at the space from the position where you normally use it. Check measurements twice, keep walkways open, and make sure the improvement does not interfere with cleaning, access, or future maintenance. Small adjustments made now are much easier than changes after the project is finished.
Know when not to DIY
Pause when electrical wiring, plumbing, gas lines, tiles, unknown masonry, or damaged walls make drilling risky. A heavy shelf above a bed or high-traffic seating needs additional care because the consequences of failure are greater.
Renters should check lease rules before drilling. Removable adhesive strips are not equivalent to a mechanically fixed floating shelf, particularly for heavy or fragile items. Consider freestanding storage if permanent mounting is not allowed.
A realistic example: In a busy household, a solution that takes an extra minute every day may not be used consistently. Choose hardware, storage, finishes, or settings that people can operate without a complicated routine. Test the proposed arrangement for several days when possible before committing to permanent work.
Common mistakes
The first common mistake is choosing a product before checking the real conditions of the home. The second is skipping basic measurements and surface preparation. A third is treating the packaging as proof that any wall, door, cabinet, or network will perform the same way. Instead, verify compatibility and follow the exact installation guidance for your situation.
Another mistake is focusing entirely on photographs. A room may look appealing but function poorly if people cannot reach storage, use the door, clean a surface, or recover access after a device fails. Evaluate the finished result in ordinary daily use.
Frequently asked questions
Can floating shelves be mounted without studs?
Sometimes, but only when the wall-specific anchors, load rating, and manufacturer instructions expressly permit it. Heavy loads usually justify fixing into framing.
How high should floating shelves be?
Choose a height that suits reach, seating, and surrounding features. Mark the placement with tape and view it from normal standing and seated positions.
Do I need a stud finder?
It is a useful tool for many framed walls, but it cannot certify that drilling is safe. Cross-check measurements and stay alert for hidden utilities.
How do I keep shelves level?
Mark a level line, install one support point at a time, and recheck after every adjustment before loading the shelf.
Final thoughts
The best results come from straightforward choices, careful preparation, and a final check that the change works as intended. Start with the highest-impact problem, choose materials and methods that fit your home, and avoid changes that introduce new safety or maintenance concerns.
If a task exposes hidden damage or involves work outside your skills, asking a qualified professional is part of doing the project well. A reliable result matters more than finishing everything in one weekend.